Pages

Friday, June 29, 2012

Friday Fffff-it :)

So you may have noticed lack of the usual "Friday Find" today.  There are so many reasons.  Lest you think I'm some kind of "queen of green" that has it all so smoothly together, here is a peek into my day.

My laptop decided to emulate a basement hooker from the red light district and get itself all kinds of full of viruses, so we spent the morning cleaning her up and getting her a decent meal and shower.  

The kids were, well, their usual selves.  Zach is a 3.5yo boy, which I'm absolutely sure is near the equivalent of a 13yo girl emotionally.  "Oh Em Gee, I can't play with glass cups?!? I shall burst into tears and run into a room and throw myself on the bed!".  Obviously my fault, because I decided to do a project with him to teach him about money that used mason jars, and apparently telling him 46 times that they are not toys was not clear.

The baby, was a perfect happy baby, until he wasn't.  Which was when he was tired, and then holy HELL was he pissed.  "You will hold me mommy! You will NOT sit in the rocking chair! You will hold me upright! You will NOT hold me laying down! You will play Nora Jones on your phone until I fall asleep! Do NOT turn the volume down! NOOO white noise will not do at ALL!  YES you will play the same song on repeat until you find that jazzy voice like nails on a chalkboard!! Did you try to SIT again? STAND WOMAN!!"  Finally he fell asleep, I'm pretty sure he is teething, at least I hope that's what this is :p.

And naturally the house is a mess, and I have laundry DONE (yay me!) and waiting for me in baskets to fold.  So y'all are gonna have to get by without a Friday Find this week ;).


Wednesday, June 27, 2012

Making Baby Food

Babies are cute, cuddly, hilarious, and EXPENSIVE!  I have posted before about ways to save money using cloth diapers and wipes.  Obviously breastfeeding saves TONS of money, (if you don't count all the food mama has to eat because she's perpetually starving, just me? ok then).  I know these things provide huge savings first hand, as I said before, my older son, Zach, was disposable diapered and formula fed, he was CRAY-ZEE expensive.  My baby, Gavin, is cloth diapered and breastfed, he's a steal!  Eventually though, the babies will start eating solids.  As with everything kid-related there is much debate and shenanigans about how to introduce solids to your kiddos.  This post is NOT to debate how to introduce solids to your baby.  This is about my experience with MY kids introducing solids to them as babies. Ok, now that we have that out of the way..

As I said, Zach was formula fed, he was also a huge kid, and a very hungry huge kid at that.  So around 4 months when he was nearing 50oz of formula a day, we decided solids might be in order, that or a second mortgage.  We started him with rice cereal and then progressed to pureed veggies and fruits.  Gavin just turned 5 months and we decided to skip the cereal and just go straight to veggies.  Gavin is also huge, and he keeps trying to snatch food out of our hands/mouths/plates, wherever and whenever he can.  Those were our reasons for starting when we did, you make the call for yourself and your baby what is best for you.  


Zach, my now 3.5yo, as a baby enjoying his first taste of homemade carrot puree
 

Any-who, after some research, and talking to friends and family that have also done this, we opted for making our own purees.  Several reasons why, first, obviously, cost.  Those little jars of food are close to $1 each! I can get carrots for $1.50/lb at the farmer's market and make the equivalent of LOTS of jars of food.  Second, ingredients, if you make it yourself you know exactly what is in there, in our case, veggies and water, that's it.  I have heard (through the rumor mill) that some companies add sugar to the baby food to make it more appealing.  I have no idea if this is true or not, but the fact is, there's no way to know, and that's not cool with me.  Third, convenience, every couple of weeks we take an hour or two on a weekend and make a big batch of food.  There are baby food cubes in our freezer ready to go.  And the last one I can think of right now, flexibility.  We can make our own blends on the fly, a cube of this, a cube of that, stir and see if the baby likes it.


Making the food is SUPER easy, basically, you steam, boil, or bake depending on the food.  There are excellent references all over the interwebs, my favorite is wholesomebabyfood.com, it lists each veggie, how to cook it to maintain the most nutrients, they suggest when to introduce foods, how to store them, basically it answers all your questions :).


This past weekend we made sweet potatoes and carrots for Gavin.  We got the veggies from the farmer's market, so they are organic, local, and fresh, BONUS :).  Four big sweet potatoes made SIX trays of baby food! About 8 carrots made 2 trays of food!  
Mr G thang enjoying his first taste of sweet potatoes

The sweet potatoes were the easiest, I washed them, poked some holes in the skin, wrapped them in foil and baked at 400 degrees for about an hour.  Then, while they were still warm, but not hot, I peeled off the skin with my hands, the skins came right off.  I roughly chopped into cubes and put it in the food processor, we used water until the puree was a thin consistency for a first food, then we put it in ice cube trays and into the freezer.  Each cube is roughly an ounce, so for now, we are just using one cube at a time as he gets used to solids.  He's a big fan so far, he grabs the spoon and giggles while shoving it in his mouth, screams when I take the spoon away.  I said the kid was huge, so he's an eater!


The carrots were a little more work, wash, peel, and chop, then put them in a steamer basket and steam until tender.  Then into the food processor they go, use fresh water (not the steamer water) for pureeing because the steam water is full of nitrates, not good for baby. Puree until they are the consistency you want and then into ice cube trays and the freezer.  Once frozen, I put them in ziploc freezer bags and label them with the veggie and date.


In the morning or the night before I take out a few cubes for the meals, let them defrost in the fridge and then warm in a glass container in the microwave.
It really can't get much easier, save a TON of money, know what your kiddos are eating, and always have food on hand for them!


Any questions?  The one thing we haven't mastered is making pureed meat for baby, any tips?


Monday, June 25, 2012

Monday Meal: Zucchini


Monday Meal

So as to give some motivation to go get some wonderful fresh veggies from the farmer's market and healthy meats from your local ranchers I thought it might be good to start a semi-regular series called "Monday Meal".

The feature this week is a zucchini side dish, easily paired with pork chops, chicken, fish, it's light, fresh, and perfect for summer!  One thing you should know about my cooking and thus recipes in general, I'm not very exact.  I like to think I'm a pretty good home cook, but I fully admit I am the world's WORST baker, too much precision required for me :). So, if you have questions please ask!


Zucchini tomato saute
  
2-3 medium zucchinis
2-3 handfuls of cherry/grape, whatever small tomato you prefer or have at the market
4 cloves of garlic, minced
1 medium yellow onion, chopped
olive oil
salt and pepper to taste
Cut the zucchini lengthwise in half, then cut the halves lengthwise again to end up with long skinny quarters, then chop up ~1/4 inch wide pieces, set aside.  Quarter or halve the tomatoes (depending on size), set aside. 

In a skillet, saute the garlic and onion in olive oil until the onion pieces are translucent.  Add the zucchini, salt and pepper, and cook until just starting to get soft (5-10 minutes). Add the tomatoes, cook those for 5-10 minutes until they are soft and stewed looking. Put on your plate and NOM.


Easy, delicious, healthy, and so cheap! What's your favorite dish to make with the summer market bounty?

Thursday, June 21, 2012

Beef, it's what's for...?


By now most of America has been scared off from red meat.  "It'll raise your cholesterol!", "It's full of fat!", and many other ridiculous assumptions.  The truth is beef, like ANY other food, *can* be bad for you if you eat the wrong kind and you eat too much.  If you're going to the steakhouse every weekend and inhaling a porterhouse, then yah, probably not doing yourself any favors.  Similarly, if you roll in to the golden arches on your lunch break, that's not beef you want to eat regularly (at all really, but we all have our vices).

If you read and followed my Friday Find from a couple of weeks ago, then you are already nodding your head.  Beef can be good for you!  Cows are meant to graze on grass, when they are allowed to do that, they are healthy.  Healthy cows don't need antibiotics, and steroids, hormones added to their diets.  In turn, when you eat beef from the healthy cows YOU aren't getting any of the added antibiotics, steroids, and hormones.  In addition, grass-fed beef is very lean, can actually lower your cholesterol, and is rich in omega-3s!  Do I have your attention now :) ?  Read more about it here. 


So now you're on board the grass-fed train, where do you get grass-fed beef?  The easiest way to try it would be to get it from a local grocery store, like Sprouts, it will probably be more expensive than regular beef, but remember it's BETTER for you, so in the long run it will save you money and your health.  It might taste different to you, for me, it was richer, more gamey, and delicious!  You will have to take care when cooking it, since it's very lean you might need to use some olive oil, there are some tips here.

Ok, say you have tried it and you're ready to make a permanent switch to eating only grass-fed beef.  The best way to go about this is to find a local farmer who raises grass-fed beef.  If you're in the Phoenix area, I HIGHLY recommend Date Creek Ranch.  They are fantastic people who truly care about what they are doing.

full shelf is 1/2 pig, bottom shelf is what's left of our 1/4 cow
You will order a quarter cow, I know this sounds daunting.  So two things, make sure you have a good separate freezer for your meat (you may find yourself doing this for pork and chicken too later on), and know that the meat will come butchered and it's not as much as you think, probably a shelf in a separate freezer, just one shelf.  See above one shelf for 1/2 pig, one shelf for 1/4 cow. You will not necessarily get to choose which cuts of meat you get, but that's part of deal.  Learning to use parts of the animal you never thought about.  Make a beef stock from neck bones for instance.  Use the whole animal instead of just going to your super store for specifically what you want, branch out, you may surprise yourself :).

We do this once, maybe twice a year.  It's a big one-time investment, but we live off of our 1/4 cow and 1/2 pig for probably 9 months at least, so I buy no beef or pork from anywhere else, at all, all of our produce comes from the farmer's market, so the only thing left is maybe some milk and yogurt from the super store.

So in the end, it's healthy protein for your family.  You're eating local, and keeping your money local, so supporting your community and ranchers.  AND you will be saving money in the long run, it is cheaper to buy meat this way, and for me at least, less trips to the super store mean less impulse purchases and thus money saved (that could totally be just me though :) ).

So are you convinced yet?  Ready to google grass-fed beef ranchers in your area?  Any questions?  What's your favorite grass-fed beef recipe?

Monday, June 18, 2012

Cloth wipes, not just for baby butts!

I mentioned in my post about cloth diapers that we also make cloth wipes.  If you're like me, you are currently horrified.  Cloth diapers are one thing, but cloth wipes?  They will DEFINITELY have a lot of poo on them *gag* amIright?  I feel you, that was totally my initial thought, but once I got past the cloth diaper phobia cloth wipes didn't seem so bad.  Stay with me, let's say you're using cloth diapers (yay you!) and you are using disposable wipes, this means you need to make sure you don't wrap up the wipes with the diapers, you have to keep a trash can AND a cloth diaper bin by the changing table, AND you have to constantly remember to buy wipes.  What a PITA!  If you use cloth wipes you can put the used wipe in the diaper, just like you used to do for disposables, and toss them both in the cloth diaper bin, AND you always have wipes because you use cloth.  Starting to come around?

We just use the cheapy baby washcloths for the wipes (lots of people make their own, my green/craftiness is not this strong, so I just bought them off of amazon like so:   Luvable Friends 12 Washcloths With Bonus Toy, Blue that's a 12 pack for under $4, I would get probably 3 of those and you'll be good to go.  Then, if you want the wipes wet (and I certainly do) then you have a few options
1) You can buy wipe solution (California Baby Diaper Area Wash - Non-Burning & Calming, 6.5 oz )
2) You can buy these to make wipe solution (Knickernappies Baby Bum Drops - Wipe Solution )
3) You can just make wipe solution yourself and save a TON of money

I prefer option #3 for obvious reasons :).  My method to make wipe solution is SUPER easy, my friend Laura told me about it and we've been using it since Gavin was itsy bitsy with no issues. It goes like this:

2 cups warm water
1 squirt baby wash (We use California Baby Super Sensitive Shampoo and Bodywash -- 19 fl oz )
3 drops tea tree oil (Now Foods Organic Tea Tree Oil, 1-Ounce)


Stir and pour over wipes in the container.  Now the components ARE expensive by themselves, BUT Gavin is almost 5 months old, and I have only bought these once, meaning for $26 I have wiped my son's behind for 5 months.  Compare that to $12 for a 3-pack of wipes that'll last you a week or two and it doesn't seem so bad now does it?  Also, you don't *have* to use California baby, any sensitive baby wash will do, and you don't *have* to use organic tea tree oil, any tea tree oil will do.  This is in there for antibacterial properties, and do NOT use more than 3-4 drops on baby's sensitive behind area, that's plenty, trust me.


We use an old wipes container and/or a wipe warmer for storage, and I found online a folding technique for the wipes that makes it so they "pop-up" like you're used to with the disposable ones.  See the folding technique in pictures below :).
Lay one washcloth flat

Add the second one and overlap top half on top of bottom half of the first one
Fold over the top of the first one

Add a 3rd one with bottom half overlapping the folded part
Fold up the bottom of the second one, next you'll place the 4th with the top overlapping this fold, fold over the 3rd one, keep going til you have a stack that will fill your wipes container

You can use these wipes for more than just baby butts too!  Keep them around for cleaning messy hands, messy faces, sticky things, whatever you would use wipes for normally, you can use in place of baby wipes and wet ones type wipes.  I'm sure you can even think of more to uses!
 

Friday, June 15, 2012

It's a Com-POST


You can thank my hubs for that CORNY title :p.  He is guest posting today for me on the subject of compost.  The Friday Find is FREE or super cheap (depending on your city) compost bins from the city!

Give him some love in the comments so he does this again, he's got plenty of corny post titles ready to go ;).

=============================

Gardening in the desert is a challenge. The soil, if you can call it that, is pretty much completely lacking in nutrients. So we started our garden in a raised bed. We bought some organic soil mix to fill the bed and had some success in growing some vegetables. But we knew we’d need to keep replenishing the nutrients so we turned to composting.
Composting has lots of benefits, but the biggest is that you can reduce the waste you send to landfill while creating nutrient-rich fertilizer for your garden. Almost any organic plant material can be used to create compost. Fruit and vegetable scraps, lawn and tree trimmings, whatever you have. Ideally, you need to have a good mix of “greens” – nitrogen-rich ingredients such as vegetable scraps – and “browns” – carbon-rich ingredients like leaves and paper. But it’s not rocket science, if you can’t get a 50/50 mixture, just try your best.
Here is a list of some things you can compost:
Greens
·         - Vegetable and fruit scraps
·         - Coffee grounds and filters
·         - Tea bags (make sure you remove any staples first)
·         - Grass
·         - Horse or cow manure
Browns
·         - Leaves
·         - Paper products, including newspaper. Careful though – some colored inks are made with heavy metals and are not good for you or your garden so check the source!
·         - Pine needles
·         - Hay or Straw

We have a small ceramic container that we keep in our kitchen to collect our scraps in. As it gets full I take it out to one of our outside bins.

There are lots of options available for storing your compost. Open bins, rotating drums, and everything in between. We originally bought a plastic bin from Amazon (Achla Designs CMP-05 Spinning Composter Horizontal) that was easy to rotate. We did this for a few reasons. First, compost needs to be mixed up from time to time to help aerate the mixture and stir up the microbes that are breaking your compost down. We thought we would be more likely to keep doing this if the compost was in something easy to rotate. Secondly, being in the desert, we thought it would help keep the mix moist. If the compost dries out it won’t decompose very quickly.

As we filled the bin, we realized we would want a second one to start filling since the compost in the drum was nearly ready to use. We happened to find out that our city offers old trash bins that they have cleaned, cut the bottom off of, and drilled several holes into for aeration. Best of all, they were free!
I cleared a spot next to our rotating bin and we started throwing our waste in there. Amazingly, our new bin is working out *much* better than the drum. The drum has a tendency to hold *too* much water in it, especially if rainwater gets in there. Since it’s a fairly closed system, there is no drainage. And let me tell you, compost that gets too wet and sits for a while gets funky. I ended up having to leave the sliding lid of the drum open for a while to dry out.

The new bin has enough aeration to keep from getting too wet, while still being closed enough to retain some moisture. I have an old floor scraper that I use to mix things up (I do this every time I empty our compost into the bin, it only take a few seconds) and as a bonus, the end is sharp enough to break larger chunks of material up.

The bin from the city

our compost pile in the bin
After using the bin we got from the city for a few months, I can honestly say I regret spending the money on the one from Amazon. The modified garbage container was FREE, and the compost is breaking down much, much faster than in the rotating drum. But if you’d rather have something that’s a bit nicer looking then there’s no problem with a professionally made product.


There are a ton of good links out there about building your own bin and what you can and can’t compost. Here are some that I’ve used before:

Tuesday, June 12, 2012

DIY hand soap

We use an obscene amount of hand soap in this house.  We're not crazy clean people, by any means, but we have a 3.5yo little BOY and a baby, so we are all constantly washing our hands.  My 3.5yo is finger painting, and snacking on sticky things, and going potty (all.by.himself.) And the baby is obviously dirtying his diapers and the changer of said diapers definitely wants/needs to wash their hands, often.  I'm obviously not interested in spending at least $3 every week to replenish our soap supply (helloooo the name of this blog should give you a clue I'm super cheap, ahem, frugal).  So, I took to pinterest to find out how to save money on hand soap, and it did not disappoint.

I know the first thing you're thinking, "just by the refills, that's cheap!".  Yah, it's not NEARLY this cheap, although I will fully admit, it's easier, so if you're supah lazy (like I tend to be on occasion) then this isn't for you.  It's just a question of how much you want to save, and how green you want to be.  I've said it before I'm just a shade of green, by no means the queen of green, for me, sometimes convenience wins.  But not this time :).  We made a GALLON of hand soap using this method, for essentially the cost of a bar of good bar of soap, so like $4-$5.  A GALLON people, it's lasted us a few months now so I will be doing this again.  Truth be told, the hubs made the first batch, but I observed and it wasn't hard at all.
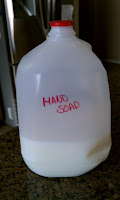
Almost gone, this was full when we made it though!
re-use one of the bottles for hand soap you have

We used the pinterests and followed the method outlined in this post by The Farmer's Nest.  We actually used Mrs. Meyer's Lemon Verbana and it smells great, very clean.  Like she says in her post, save the jug from the distilled water and put your homemade soap in there for storage.  And make sure you keep the bottles from the hand soap you bought before you knew you could make it to refill with this MUCH cheaper version ;).

These are the supplies, you can get easily from Amazon, and this will give you MORE than enough to get started!  You can make like 6 batches with this stuff for under $40.

Truth?  She mentions this in her post, but it kinda does look/feel like snot, but it does the job, so really can we be so picky?  Keep in mind when you buy it pre-made from the store you are paying for WATER, I mean really, when she put it like that, I was fully motivated to try it out.  So I already mentioned, it's cheap, it's green because you are not buying all kinds of plastic bottle packaging and and soap that potentially has an assortment of chemicals in it.  You know exactly what is in this.  I say, try it out, what's the worst that could happen?  You don't like it, and go back to buying soap.  OR you could love it and love saving money ;).

Sunday, June 10, 2012

No-Poo Part III


Week 3 of No-Pooing has been pretty uneventful, in a good way :), I actually stopped noting day-to-day differences because there weren't any. I think my hair has assimilated to this new way of cleaning.

I have been following the same strategy I was using at the end of last week, with very minor tweaks.  I am still using the standard 1 Tbsp baking soda and 1 cup of water mixture for the "shampoo", and the 1 Tbsp apple cider vinegar, and 1 cup of water mixture for "conditioner".  I added a few drops (like 2 or 3) of lavender oil to both mixtures.  I added it to the "shampoo" to combat any potential itch, I mentioned I was having previously and for it's antibacterial properties.  I added it to the "conditioner" simply to add a nice scent.  Like I said before, my hair didn't smell like vinegar, it smelled like... nothing, and I was missing that nice scent after cleaning it, so I added some drops, I'm good now :).

I'm still using the Burt's Bees stuff on my wet ends, I really want to try the coconut oil still, but I can never seem to remember (I shower at night before bed, so I'm usually a bit tired).  

Other than that, I can't see anything changing with how I care for my hair.  I'm THRILLED with the results, so I'm calling it.. I'm SOLD.  Officially a no-poo-er over here :).  I most likely won't post a week 4 update because if it's anything like week 3, there's nothing to update you on.  I will update if I ever remember to use the coconut oil, AND pretty soon I'm going to need a hair cut, so I'll update on what my hair stylist thinks of all of this ;).  

No-Poo is a SUCCESS!  Super cheap, better for my hair, and EASY, what's not to like?  Are you ready to "call-it" yet?  What are you doing differently?


Previous No-Poo Diaries:
No-Poo Part I
No-Poo Part II